Perform Sensor Operations
In this tutorial, we will explain, step-by-step, how to start or stop collection on a sensor and how to restart a sensor.
You must have the System Admin role added for your Cybereason user to perform these commands.
Note
Some sensor settings, such as Anti-Malware, Anti-Ransomware, and PowerShell/.NET Protection must be set using a sensor policy. This tutorial does not cover the settings that you update in a sensor policy.
Sometimes, when you troubleshoot issues with your organization’s sensors, you need to start collection on a sensor or restart a sensor. You can use the API to automate these operations.
In this topic:
Build the request to start collection
Note
The request body is the same regardless of how you run the request (such as a cURL command, in a REST API client, or Python script).
Ensure you log in to the Cybereason platform with the API. For details, see Log in with the API.
In your REST API client, open a new tab/file.
In the relevant field, enter the URL for the request:
https://<your server address>/rest/sensors/action/startCollection
For example, in Postman, you enter the URL here:

Ensure that the method for the request is set to POST. (This may be the default for your REST API client, but if not ensure that you select it.)

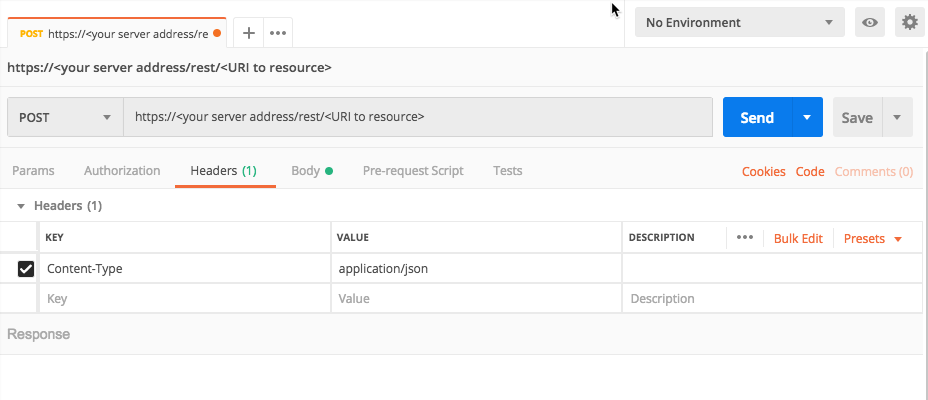
For the Headers, for the Key column, add a Content-Type header.
In the Value column, add the value application/json.
For example, in Postman, your header will look like this:
Navigate to the section to add your request body. In Postman, for example, this is in the Body tab.
In the Body tab, ensure that you have set your client editor to enable you to add raw JSON content. In Postman, for example, ensure that Raw is selected.
In the request body edit area, enter an open and closed bracket {}.
You are now ready to begin adding the content for the request doy.
Inside the brackets, add this template request body:
{
          "sensorsIds": [
              "<sensorIDs>"
          ],
          "filters": [
              "<filters>"
          ]
      }
You will fill in this request part by part in the following steps.
In this request body, you will start collection on a sensor. To do this, you must provide the unique sensor ID the Cybereason platfrrom uses to identify the sensor. For details on how to retrieve the sensor ID with the API, see the Query Sensors API reference topic.
In the request body, in the sensorIds object, for the sensorIDs placeholder value, enter 58ae74fae4b06dca39c1d4bc:PYLUMCLIENT_INTERNAL_CYBERSETUP7X64_005056A13A24 (a fictitious sensor ID).
If you are using this tutorial to start collection on a sensor in your production environment, you may need to update this value for a real sensor ID.
{
          "sensorsIds": [
              "**58ae74fae4b06dca39c1d4bc:PYLUMCLIENT_INTERNAL_CYBERSETUP7X64_005056A13A24**"
          ],
          "filters": [
              "<filters>"
          ]
      }
In the request, remove the filters object and the comma before the filters object to ensure proper JSON syntax:
{
          "sensorsIds": [
              "**58ae74fae4b06dca39c1d4bc:PYLUMCLIENT_INTERNAL_CYBERSETUP7X64_005056A13A24**"
          ]
      }
In your client machine, run the request.
Your API client will display details on the operation to start collection.
Note
This request may fail is you use the fictitious sensor ID in this tutorial or if collection is already enabled on the sensor that you specify in the request body.
Build the request body to restart a sensor
Note
The request body is the same regardless of how you run the request (such as a cURL command, in a REST API client, or Python script).
In your REST API cleint, open another tab/file.
In the relevant field, enter the URL for the request to restart a sensor.
https://<your server address>/rest/sensors/action/restart
For example, in Postman, you enter the URL here:
Ensure that the method for the request is set to POST. (This may be the default for your REST API client, but if not ensure that you select it.)
For the Headers, in the Key column, add a Content-Type header.
In the Value column, add the value application/json.
For example, in Postman, your header will look like this:
Navigate to the section to add your request body. In Postman, for example, this is the Body tab.
In the Body tab, ensure that you have set your client editor to enable you to add raw JSON content. In Postman, for example, ensure that Raw is selected.
In the request body edit area, enter an open and closed bracket {}. This is the standard syntax for JSON.
You are now ready to begin adding the objects and key/value pairs that build the request body.
Inside the brackets, add this template request body:
{
          "filters": [
              "<filters>"
          ]
      }
You will fill in this request part by part in the following steps.
In this request, you restart a filtered group of sensors. To do this, you must provide the details for the filter. For details on the available fields to use for filters, see Query Sensors API reference topic.
In the request body, in the filters object, add this template syntax for the filters object:
{
    "filters": [{
        "fieldName": "filter field",
        "operator": "operator",
        "values": ["value"]
    }]
 }
In this example, you restart all Windows sensors. In the filters object, for the fieldName key, update the filter field placeholder to osType.
{
      "filters": [{
          "fieldName": "**osType**",
          "operator": "operator",
          "values": ["value"]
      }]
   }
For each value, you must also add an operator. Since the osType field is an enum, you must add the operator for an enum. For the operator key, for the operator placeholder value, update the value to Equals.
{
      "filters": [{
          "fieldName": "osType",
          "operator": "**Equals**",
          "values": ["value"]
      }]
   }
The last value you must update for the filters object in the request body is the value or values by which to filter. For the osType field, there are multiple possible values. However, for this example, you filter for Windows sensors.
In the filters object, for the values array, update the value 1 placeholder value with Windows.
{
     "filters": [{
         "fieldName": "osType",
         "operator": "Equals",
         "values": ["Windows"]
     }]
  }
In your client machine, run your request.
View the response
The response contains details on the restart operation:
{
 "batchId": -1586639122,
 "actionType": "Restart",
 "actionArguments": null,
 "globalStats": {
     "stats": {
         "FailedSending": 0,
         "InvalidState": 0,
         "ProbeRemoved": 0,
         "TimeoutSending": 0,
         "Pending": 0,
         "ChunksRequired": 0,
         "MsiFileCorrupted": 0,
         "SendingMsi": 0,
         "NewerInstalled": 0,
         "MsiSendFail": 0,
         "partialResponse": 0,
         "EndedWithSensorTimeout": 0,
         "FailedSendingToServer": 0,
         "GettingChunks": 0,
         "Aborted": 0,
         "Started": 0,
         "InProgress": 0,
         "Disconnected": 0,
         "Failed": 0,
         "Timeout": 0,
         "EndedWithTooManyResults": 0,
         "AlreadyUpdated": 0,
         "EndedWithTooManySearches": 0,
         "Succeeded": 0,
         "NotSupported": 0,
         "EndedWithUnknownError": 0,
         "None": 1,
         "Primed": 0,
         "EndedWithInvalidParam": 0,
         "UnknownProbe": 0,
         "AbortTimeout": 0,
         "UnauthorizedUser": 0
     }
 },
 "finalState": false,
 "totalNumberOfProbes": 1,
 "initiatorUser": "[email protected]",
 "startTime": 1523875273515,
 "aborterUser": null,
 "abortTime": 0,
 "abortTimeout": false,
 "abortHttpStatusCode": null
 }
To ensure your update operation succeeded, look for these specific fields:
The batchId key must contain the operation number.
The actionType key must say the name of the operation startCollection, Restart, and so forth.
In the stats object, the Succeeded key should contain the full number of sensors. If some machines did not restart, the other keys in the stats object object report the number of machines for each failure status.
Next steps
You can now incorporate these commands into your sensor operation.
If you need to abort an operation after it has begun, you can also use the API to abort the sensor operation. For details, see the Abort an Operation API reference topic.