First Steps
You can use the API to help you automatically perform a number of common Cybereason tasks. Follow the steps described in this example to help you start working with the API.
For a specific example on first steps by using the Postman API client, see First Steps with Postman.
Watch a video showing you how to get started with the API:
In this topic:
Step 1: Determine what API to use
The Cybereason API provides a number of API endpoints for many different Cybereason tasks, such as running investigation queries, retrieving Malop information, updating Sensor settings, and so forth. Determine what task you need to perform with the API.
Then, find the relevant API endpoint and reference. For details, see Endpoints and click on the endpoint name to view the appropriate reference page.
Step 2: Log in with the API
Before you start sending API requests, you must log in with the API.
Send an authentication request
Follow the steps to log in (depending on the framework you use):
cURL
When you log in with cURL, you have the option of providing your credentials in a separate file or including the credentials in the command.
In a command window, enter one of the following commands:
If you add your credentials in a separate file:
curl -X POST https://[hostname]:[port]/login.html -d @authentication.txt --header "Content-Type:application/x-www-form-urlencoded" -c cookie.txt
In the separate file (login.txt in this example) add your credentials in the format username=<username>&password=<my password>. The username parameter uses the %40 encoding in place of the @ character.
For example, you can use this for authentication: username=admin%40myserver.com&password=3GYvP9ADQWak.
If you enter your credentials directly in the command:
curl -X POST https://[hostname]:[port]/login.html -d "username=<username>&password=<my password>" --header "Content-Type:application/x-www-form-urlencoded" -c cookie.txt
In this command:
The [hostname]:[port] parameter is the address to your Cybereason server.
The username parameter uses the %40 encoding in place of the @ character.
The cookie.txt contains the authentication cookie for access. Your machine stores the cookie in the root folder where you opened the command window.
REST API Client
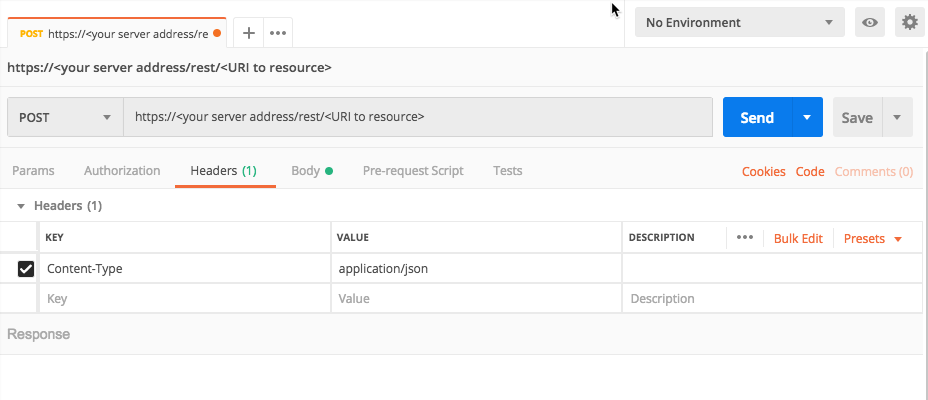
- In your client, create a new request for authentication and save it with a descriptive name.
Set the request method to POST.
Enter the URL for your server in the format
https://[hostname]:[port]/login.html.Set the header value to Content-Type with the value application/x-www-form-urlencoded.
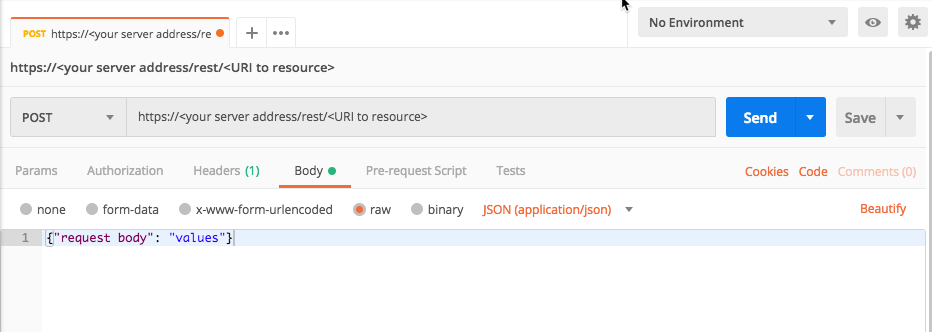
In the request body, create a key for username and password. Enter your username and password as the values for these keys.
Send the request in your client.
Cybereason returns a cookie stored in your client for the rest of your session.
Python
Ensure that Python version 2.7 or higher is installed on your system.
Install the requests library using this command:
pip install requests
Create your own Python script with this content:
import requests

username = "<your user name>"
password = "<password>"
server = "<server URL>"
port = "443"

data = {
    "username": username,
    "password": password
}
headers = {"Content-Type": "application/x-www-form-urlencoded"}

base_url = "https://" + server + ":" + port
login_url = base_url + "/login.html"

session = requests.session()
response = session.post(login_url, data=data, headers=headers, verify=True)

print response.status_code
print session.cookies.items()
The variables in this script include:
Variable |
Type |
Description |
server |
String |
The base URL for your server. Enter the URL without the https:// prefix. |
username |
String |
Your Cybereason user name. |
password |
String |
The password for your Cybereason user name. |
port |
Integer |
The port used for your Cybereason server. |
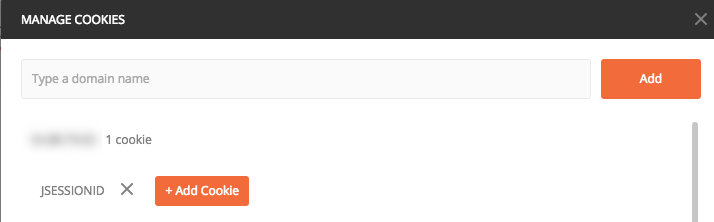
After a successful login, the server sends an authentication cookie to your machine that is stored on the machine. Additional requests after this initial login use the cookie automatically.
This example shows the authentication cookie for a request sent via the Postman API client:
Step 3: Build your API request
To build your API request, you must provide the necessary information. This content of the request differs depending on the endpoint.
For each request you must provide:
The URL for the specific resource
The request header
A request body detailing the data you want to retrieve or modify
For links to topics with details on individual endpoints and their URLs, request header, and request bodies, see Endpoints. In the table in the Endpoints topic, click the endpoint URL to access the API reference topic for that endpoint.
Use the following template command, request body, or script to help you formulate a request. Replace the placeholder URL and request body in these templates to match the required content for a specific API endpoint request.
All Python examples are formatted for Python version 3.0 and higher, up to the latest Python version. If you are using versions of Python earlier than 3.0, ensure you manually remove parentheses for the print statements in this sample. For example, the print (response.content) statement updates to print response.content.
In the Python examples below, the sample code shows how to log in to your server and how to avoid any user authentication issues.
curl --request POST \
 --url https://<your server>/rest/<URI to resource> \
 --header 'Content-Type:application/json' \
 --data '{
           <request body>
         }'
For requests that use the POST or PUT methods:
import requests
import json

username = "[email protected]"
password = "mypassword"
server = "yourserver.com"
port = "443"

data = {
    "username": username,
    "password": password
}

headers = {"Content-Type": "application/json"}

base_url = "https://" + server + ":" + port

login_url = base_url + "/login.html"

session = requests.session()

login_response = session.post(login_url, data=data, verify=True)

print login_response.status_code
print session.cookies.items()

# Request URL

endpoint_url = "<url to API endpoint>"

api_url = base_url + endpoint_url

import requests

request = json.dumps({<request body>})

headers = {'Content-Type': 'application/json'}

api_response = session.request("POST", api_url, data=request, headers=api_headers)

your_response = json.loads(api_response.content)

print(json.dumps(your_response, indent=4, sort_keys=True))
For requests that use the GET methods:
import requests
import json

username = "[email protected]"
password = "mypassword"
server = "yourserver.com"
port = "443"

data = {
    "username": username,
    "password": password
}

headers = {"Content-Type": "application/json"}

base_url = "https://" + server + ":" + port

login_url = base_url + "/login.html"

session = requests.session()

login_response = session.post(login_url, data=data, verify=True)

print login_response.status_code
print session.cookies.items()

# Request URL

endpoint_url = "<url to API endpoint>"

api_url = base_url + endpoint_url

import requests

headers = {'Content-Type': 'application/json'}

api_response = session.request("GET", api_url, headers=api_headers)

your_response = json.loads(api_response.content)

print(json.dumps(your_response, indent=4, sort_keys=True))
Example
Request
curl --request POST \
  --url https://12.34.56.78/rest/sensors/query \
  --header 'Content-Type:application/json' \
  --data '{
            "mode": "raw",
            "raw": "{\"limit\":1000,\"offset\":0}"
          }'
Request

Depending on your browser settings, this linked file may open in a separate tab instead of downloading directly to your machine. If this happens, use the Save As option in your browser to save the file locally.
Use this request body:
{
  "limit": 1000,
  "offset": 0
}
Request
Depending on your browser settings, this linked file may open in a separate tab instead of downloading directly to your machine. If this happens, use the Save As option in your browser to save the file locally.
import requests
import json

# Login information

username = "[email protected]"
password = "mypassword"
server = "yourserver.com"
port = "443"

data = {
    "username": username,
    "password": password
}

headers = {"Content-Type": "application/json"}

base_url = "https://" + server + ":" + port

login_url = base_url + "/login.html"

session = requests.session()

login_response = session.post(login_url, data=data, verify=True)

print (login_response.status_code)
print (session.cookies.items())

# Request URL

endpoint_url = "/rest/sensors/query"

api_url = base_url + endpoint_url

query = json.dumps({"limit": 1000,"offset":0})

api_headers = {'Content-Type':'application/json'}

api_response = session.request("POST", api_url, data=query, headers=api_headers)

your_response = json.loads(api_response.content)

print(json.dumps(your_response, indent=4, sort_keys=True))
Step 4: Run the request
After you add the relevant details to the request, send the request to your server, by sending the cURL command or request body in a REST API client, or running the relevant script you created.
The server will return a response with the request details.
Step 5: Evaluate the response information
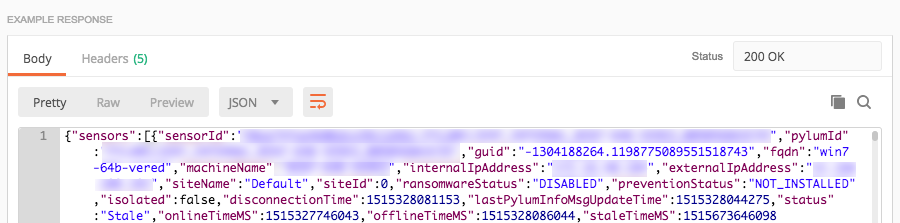
Once the platform has returned a response, view the JSON data in the response for important information.
Most Cybereason API requests return a JSON body request containing numerous fields. You may want to use a JSON parser program to make the JSON syntax more readable. For example, if you use Postman, there is an option to view the JSON in the response as ‘pretty’:
For those requests that return CSV data, you can view the CSV in an Excel file.
The fields available in the response differ from API. View your specific API reference topic to learn more about the fields contained in the response.
Here are a few general tips to keep in mind when viewing the response information:
Ensure that you understand what to expect for your organization. For example, if you know what processes and addresses are used throughout your organization and what normal settings are for your Sensors, you can skip the expected items in the results and focus on the unexpected items.
Focus more on items that occur by themselves. In nearly all organizations, the same items and settings are used by multiple users and results return these items in large numbers. The results occurring in isolation warrant more of your attention.
You can also add code or write a script to parse the results and add them to a file to read. In this example, you see Python code to take the response and add it to an open file:
sensor_download_url = base_url + "/rest/sensors/download/csv"
headers = {'Content-Type': 'application/octet-stream'}
response = session.get(sensor_download_url, headers=headers)

with open('sensorsDownload.csv', 'w') as s:
    s.write(response.content)