Perform Response Actions
In this tutorial, we will explain, step-by-step, how to perform different response actions on items, both when they are associated with a Malop and not associated with a Malop.
You must have the Analyst L3 role to perform these requests.
You may want to use the API to automate responses to certain items, such as processes or files. Normally, you would need to response in a separate step from Malop analysis and triage. However, using the API, you can potentially automate remediation of items.
In this topic:
Find the item GUID
When you perform response actions with the API, you must provide the unique ID the Cybereason platform uses for the item (process, file, etc.). This ID is referred to as the GUID for the item.
You have a couple of options to find the GUID with the API:
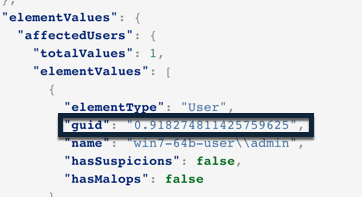
In the response when you receive when retrieving Malop details, you can see the GUID for related Elements in the elementValues object. For each related Element, there is a guid field:
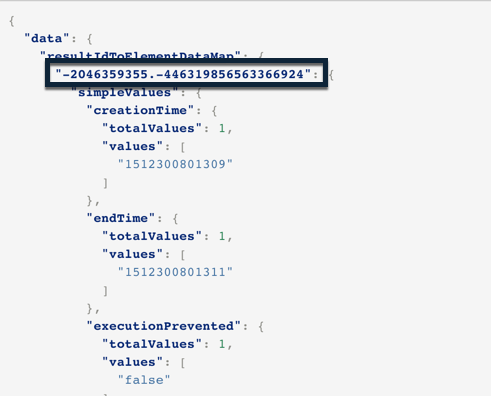
When you run an investigation query, the response contains the GUID for each result instance (for example, each individual process or machine):
Stop a process associated with a Malop
Note
The request body is the same regardless of how you run the request (such as a cURL command, in a REST API client, or Python script).
In your REST API client, open a new tab/file.
In the relevant field, enter the URL for the request:
https://<your server address>/rest/remediate
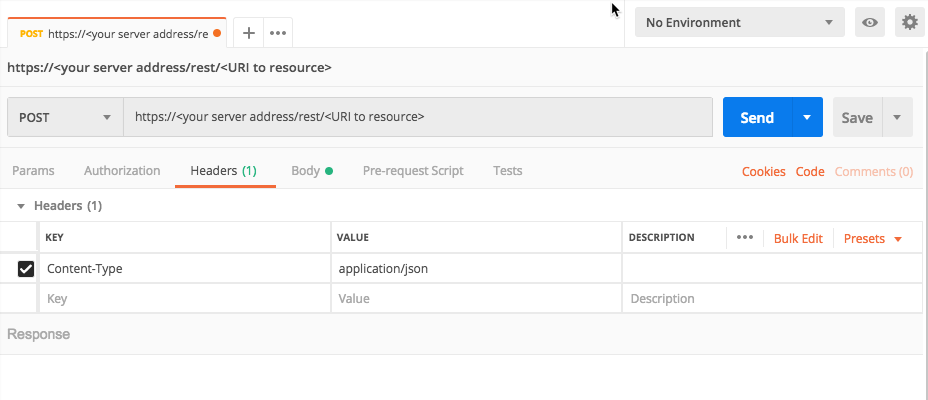
For example, in Postman, you enter the URL here:

Ensure that the method for the request is set to POST. (This may be the default for your REST API client, but if not ensure that you select it.)
For example, in Postman, you enter the URL here:

For the Headers, in the Key column, add a Content-Type header.
In the Value column, add the value application/json.
For example, in Postman, your header will look like this:
Navigate to the section to add you request body. In Postman, for example, this is the Body tab.
In the Body tab, ensure that you have set your client editor to enable you to add raw JSON content. In Postman, for example, ensure that Raw is selected.
In the request body edit area, enter an open and closed bracket {}. This is the standard syntax for JSON.
Inside the brackets, add this template request body:
{
          "malopId": "<malopID>",
          "initiatorUserName": "<user name>",
          "actionsByMachine": {
              "<machineID>": [
                  {
                      "targetId":"<item GUID>",
                      "actionType": "<action>"
                  }
              ]
          }
      }
In this example, you will perform a response action (stop a process) on a process associated with a Malop. (You can also perform response actions without a Malop).
In the request body, for the malopID key, update the <malopID> placeholder value with 11.2718161727221199870 (a fictitious Malop ID).
Note
If you use are using this request to perform response actions in your production environment, ensure you use a real Malop ID.
{
          "malopId": "**11.2718161727221199870**",
          "initiatorUserName": "<user name>",
          "actionsByMachine": {
              "<machineID>": [
                  {
                      "targetId":"<item GUID>",
                      "actionType": "<action>"
                  }
              ]
          }
      }
Below the malopId key, in the initiatorUserName key, update the <user name> placeholder value with admin@myserver.com or a relevant user name for your environment.
{
          "malopId": "11.2718161727221199870",
          "initiatorUserName": "**[email protected]**",
          "actionsByMachine": {
              "<machineID>": [
                  {
                      "targetId":"<item GUID>",
                      "actionType": "<action>"
                  }
              ]
          }
      }
For each response action, you need to specify the machine on which you must perform the action, especially if the same process exists on a number of machines.
In the request body, in the actionsByMachine object, for the <machineID> placeholder value, update the value to -1632138521.1198775089551518743 (a fictitious GUID for a machine).
{
          "malopId": "11.2718161727221199870",
          "initiatorUserName": "[email protected]",
          "actionsByMachine": {
              "**-1632138521.1198775089551518743**": [
                  {
                      "targetId":"<item GUID>",
                      "actionType": "<action>"
                  }
              ]
          }
      }
Once you specify the machine on which to perform the response action, you must also provide the identifier for the specific item (in this case, a process).
Below the machine identifier, in the targetId key, update the <item GUID> placeholder value to -1632138521.1198775089551518743 (a fictitious process GUID).
{
          "malopId": "11.2718161727221199870",
          "initiatorUserName": "[email protected]",
          "actionsByMachine": {
              "-1632138521.1198775089551518743": [
                  {
                      "targetId":"**-1632138521.1198775089551518743**",
                      "actionType": "<action>"
                  }
              ]
          }
      }
Lastly, you must provide the type of response action for the specific item. The action you select depends on the type of item - for example, you would add the action to stop a process for a process, but not for a file.
There are a number of different response action options, including KILL_PROCESS, DELETE_REGISTRY_KEY, and QUARANTINE_FILE. For this example, since you want to stop a process, you would use KILL_PROCESS.
Below the targetId key, in the actionTuype key, for the <action> placeholder value, enter KILL_PROCESS.
{
          "malopId": "11.2718161727221199870",
          "initiatorUserName": "[email protected]",
          "actionsByMachine": {
              "-1632138521.1198775089551518743": [
                  {
                      "targetId":"-1632138521.1198775089551518743",
                      "actionType": "**KILL_PROCESS**"
                  }
              ]
          }
      }
In your client machine, run the request.
Quarantine a file not associated with a Malop
Note
The request body is the same regardless of how you run the request (such as a cURL command, in a REST API client, or Python script).
In your REST API client, open another new tab/file.
In the relevant field, enter the URL for the request.
https://<your server address>/rest/remediate
Ensure that the method for the request is set to POST. (This may be the default for your REST API client, but if not , ensure that you select it.)
For the Headers, in the Key columnm, add a Content-Type header.
In the Value column, add the value application/json.
Navigate to the section to add your request body. In Postman, for example, this is the Body tab.
In the Body tab, ensure that you have set your client editor to enable you to add raw JSON content. In Postman, for example, ensure that Raw is selected.
In the request body edit area, enter an open and closed bracket {}. This is the standard syntax for JSON.
Inside the brackets, add this template request body:
{
          "initiatorUserName": "<user name>",
          "actionsByMachine": {
              "<machineID>": [
                  {
                      "targetId":"<item GUID>",
                      "actionType": "<action>"
                  }
              ]
          }
      }
In the initiatorUserName key, update the <user name> placeholder value with admin@myserver.com or a relevant value for your environment.
{
          "initiatorUserName": "**[email protected]**",
          "actionsByMachine": {
              "<machineID>": [
                  {
                      "targetId":"<item GUID>",
                      "actionType": "<action>"
                  }
              ]
          }
      }
For each response action, you need to specify the machine on which you must perform the action, especially if the same process exists on a number of machines.
In the request body, in the actionsByMachine object, for the <machineID> placeholder value, update the value to -1632138521.1198775089551518743 (a fictitious GUID for a machine).
{
          "initiatorUserName": "[email protected]",
          "actionsByMachine": {
              "**-1632138521.1198775089551518743**": [
                  {
                      "targetId":"<item GUID>",
                      "actionType": "<action>"
                  }
              ]
          }
      }
Once you specify the machine on which to perform the response action, you must also provide the identifier for the specific item (in this case, a file).
Below the machine identifier, in the targetId key, update the <item GUID> to -1632138521.1198775089551518743 (a fictitious file GUID).
{
          "initiatorUserName": "[email protected]",
          "actionsByMachine": {
              "1632138521.1198775089551518743": [
                  {
                      "targetId":"**-1632138521.1198775089551518743**",
                      "actionType": "<action>"
                  }
              ]
          }
      }
Lastly, you must provide the type of response action for the specific item. The action select depends on the type of item - for example, you would add the action to stop a process for a process, but not for a file.
Since this example is working with a file, you select QUARANTINE_FILE. After you use the QUARANTINE_FILE action, later you can use the UNQUARANTINE_FILE option to remove the file from quarantine.
Below the targetId key, in the actionType key, for the <action> placeholder value, enter QUARANTINE_FILE.
{
          "initiatorUserName": "[email protected]",
          "actionsByMachine": {
              "1632138521.1198775089551518743": [
                  {
                      "targetId":"-1632138521.1198775089551518743",
                      "actionType": "**QUARANTINE_FILE**"
                  }
              ]
          }
      }
In your client machine, run the request.
Verify that the action succeeded
When you run the request, the Cybereason platform returns details on the response operation.
Note
If the Cybereason platform returns the 200 HTTP status code for the request, this does not conclusively mean that the response action completed on the machine. The HTTP 200 status means that the server has successfully processed the request. However, the actual response action is handled by a different component of the Cybereason platform.
{
 "malopId": "11.2718161727221199870",
 "remediationId": "86f3faa1-bac0-4a17-9192-9d106b734664",
 "start": 1518604850656,
 "end": 1518604850744,
 "initiatingUser": "[email protected]",
 "statusLog": [
                 {
                     "machineId": "-1632138521.1198775089551518743",
                     "targetId": null,
                     "status": "SUCCESS",
                     "actionType": "KILL_PROCESS",
                     "timestamp": 1518604850714
                 }
              ]
 }
In particular, in the response, you want to look at these fields:
remediationId: This is the unique ID the Cybereason platform uses for the speicific response operation. You can use this ID to check the status of the response operation later.
status: This is the current status of the remediation action.
IF you would like to check the actual status of the response action later (if the item is associated with a Malop), you can send a request with the GET method using this URL:
https://<your server address>/rest/remediate/progress/<username>/<malop ID>/<remediation ID>
As part of this request, you add the following parameters in the URL:
username
The unique Malop ID
The unique remediation ID
Next steps
Now that you understand how to set up a request to perform a response action, you can incorporate these requests into your Malop triage and response framework.