Create a Custom Detection Rule
Sometimes, you will find behaviors in your environment for which you wish to generate a Malop any time this behavior is detected but where there is no Cybereason Malop for the behavior. In these cases, you create a custom detection rule to enable the generation of Malops for you.
While the example in this topic uses specific Elements and Features, you can easily substitute any Element and its relevant Feature (filter) for your own queries.
Custom detection rules created via API should be created only after adequate research regarding precision and coverage has been completed. Creating a custom detection rule that is not specific enough can have detrimental impact on retention and overall performance of the environment.
Follow these steps to create a custom detection rule:
Step 1: Plan what behavior you want to trigger a Malop
Before you create a custom rule, determine exactly what behavior you want to detect. The behavior should be as specific as possible to limit the amount of false positive Malops. For example, you would not want to generate a Malop based on a custom rule of the cmd.exe process running. This would cause an unnecessary strain on your Cybereason servers and cause performance and retention problems for the platform.
For the example in this topic, we will look for instances where Microsoft Office processes open a shell process. This is a known behavior for phishing attacks.
Step 2: Build your custom rule
When you build the custom rule (much like an investigation query) you add Elements and filters (Features). The Elements represent the component parts of the behavior (processes, connections, and so forth). The behaviors of these components are the filters (such as the process being a Microsoft Office process).
In the Build a rule part of the Custom Detection Rules screen, build the following parts for the rule:
Add a Process.
Click Add filters.
In the filter search bar, enter Product type is Microsoft Office and click Done.
Next to the Process Element, click the + sign to add another Element.
Add a Children Element.
Under the Children Element, click Add filters.
In the filter search bar, enter Product type is Shell and click Done.
Next to the rule builder, enter the rule properties:
Give a name and description to the rule.
Set the Root cause to self.
Set the Detection type to Custom rule.
Set the Detected activity to Infection.
The rule you built looks like this:

Step 3: Save the query and generate the request body
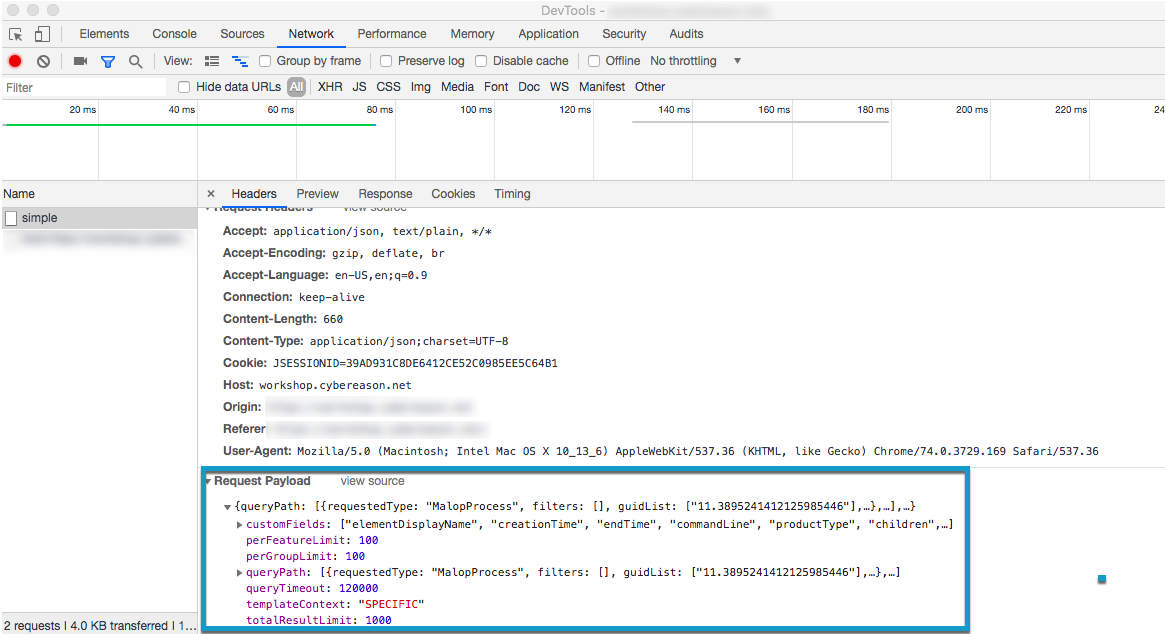
In Chrome, open Chrome DevTools.
In the Cybereason Custom detection rules screen, click Save rule.
Select the Network tab in Chrome DevTools, and then select the request called /create.
In the Request Payload section in the lower part of the window, copy the entire request payload. You will use this in the request body for API request.
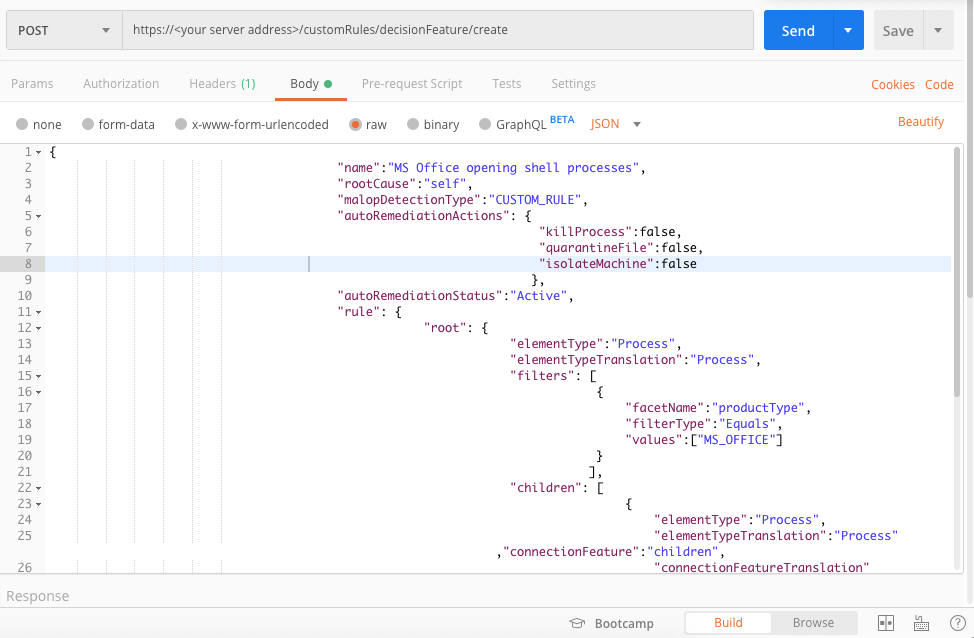
Step 4: Build the API request
Use the relevant cURL command, request body example, or Python script:
curl --request POST \
        --url https://<your server>/rest/customRules/decisionFeature/create \
        --header 'Content-Type:application/json' \
        --data '{
                            "name":"MS Office opening shell processes",
                            "rootCause":"self",
                            "malopDetectionType":"CUSTOM_RULE",
                            "autoRemediationActions": {
                                                                                    "killProcess":false,
                                                                                    "quarantineFile":false,
                                                                                    "isolateMachine":false
                                                                               },
                            "autoRemediationStatus":"Active",
                            "rule": {
                                                    "root": {
                                                                            "elementType":"Process",
                                                                            "elementTypeTranslation":"Process",
                                                                            "filters": [
                                                                                                    {
                                                                                                            "facetName":"productType",
                                                                                                            "filterType":"Equals",
                                                                                                            "values":["MS_OFFICE"]
                                                                                                    }
                                                                                               ],
                                                                            "children": [
                                                                                                            {
                                                                                                                    "elementType":"Process",
                                                                                                                    "elementTypeTranslation":"Process","connectionFeature":"children",
                                                                                                                    "connectionFeatureTranslation":"Children",
                                                                                                                    "reversed":false,
                                                                                                                    "filters": [
                                                                                                                                            {
                                                                                                                                                    "facetName":"productType",
                                                                                                                                                    "filterType":"Equals",
                                                                                                                                                    "values":["SHELL"]
                                                                                                                                            }
                                                                                                                                       ]
                                                                                                            }
                                                                                                    ]
                                                                    },
                                                    "malopActivityType":"MALICIOUS_INFECTION"
                                            },
                            "description":"Find examples of MS Office programs opening shell processes",
                            "enabled":true
                    }'
Depending on your browser settings, this linked file may open in a separate tab instead of downloading directly to your machine. If this happens, use the Save As option in your browser to save the file locally.
Use this as the request body:
{ "name": "MS Office opening shell processes", "rootCause": "self", "malopDetectionType": "CUSTOM_RULE", "autoRemediationActions": { "killProcess": false, "quarantineFile": false, "isolateMachine": false }, "autoRemediationStatus": "Active", "rule": { "root": { "elementType": "Process", "elementTypeTranslation": "Process", "filters": [ { "facetName": "productType", "filterType": "Equals", "values": [ "MS_OFFICE" ] } ], "children": [ { "elementType": "Process", "elementTypeTranslation": "Process", "connectionFeature": "children", "connectionFeatureTranslation": "Children", "reversed": false, "filters": [ { "facetName": "productType", "filterType": "Equals", "values": [ "SHELL" ] } ] } ] }, "malopActivityType": "MALICIOUS_INFECTION" }, "description": "Find examples of MS Office programs opening shell processes", "enabled": true }Depending on your browser settings, this linked file may open in a separate tab instead of downloading directly to your machine. If this happens, use the Save As option in your browser to save the file locally.
import requests
import json

# Login information

username = "[email protected]"
password = "mypassword"
server = "yourserver.com"
port = "443"

data = {
    "username": username,
    "password": password
}

headers = {"Content-Type": "application/json"}

base_url = "https://" + server + ":" + port

login_url = base_url + "/login.html"

session = requests.session()

login_response = session.post(login_url, data=data, verify=True)

print (login_response.status_code)
print (session.cookies.items())

# Request URL

endpoint_url = "/rest/customRules/decisionFeature/create"

api_url = base_url + endpoint_url

# These are the variables that represent different fields in the request.

name = "MS Office opening shell processes"
root_cause = "self"
detection_type = "CUSTOM_RULE"
activity_type = "MALICIOUS_INFECTION"
rule_element_1 = "Process"
rule_element_1_translation = "Process"
rule_element_1_filter_1 = "productType"
rule_element_1_filter_1_value = "MS_OFFICE"
connection_feature = "children"
connection_feature_translation = "Children"
rule_element_2_filter_1_value = "SHELL"
description = "Find examples of MS Office programs opening shell processes"

query = json.dumps({"name":name,"rootCause":root_cause,"malopDetectionType":detection_type,"autoRemediationActions":{"killProcess":False,"quarantineFile":False,"isolateMachine":False},"autoRemediationStatus":"Active","rule":{"root":{"elementType":rule_element_1,"elementTypeTranslation":rule_element_1_translation,"filters":[{"facetName":rule_element_1_filter_1,"filterType":"Equals","values":[rule_element_1_filter_1_value]}],"children": [{"elementType":rule_element_1,"elementTypeTranslation":rule_element_1_translation,"connectionFeature":connection_feature,"connectionFeatureTranslation":connection_feature_translation,"reversed":False,"filters": [{"facetName":rule_element_1_filter_1,"filterType":"Equals","values":[rule_element_2_filter_1_value]}]}]},"malopActivityType":activity_type},"description":description,"enabled":True})

api_headers = {'Content-Type':'application/json'}

api_response = session.request("POST", api_url, data=query, headers=api_headers)

your_response = json.loads(api_response.content)

print(json.dumps(your_response, indent=4, sort_keys=True))
Step 5: Run the request and generate the response
In the command line, REST API client, or IDE, run the command or script that contains the request. After a few seconds, the Cybereason API returns a response.
Step 6: Evaluate the response
After you run the request, ensure you receive a HTTP status code of 200, showing the request was processed correctly. In addition, make sure the response contains the id parameter, which verifies that the Cybereason platform correctly created the detection rule.