Automatically Remediate Items in a Malop
Sometimes, you may want to automatically perform certain types of response activities to items involved in a Malop. This ensures that the machines in question remain in a relatively safe state while you investigate the malicious activity further.
Using the Cybereason API, you can create a script that enables you to automatically remediate certain items included in a Malop.
In this topic:
Step 1: Build the request to retrieve Malops
Before you can remediate items associated with a Malop, you first must retrieve the Malops in your environment.
Because the Cybereason platform generates Malops based on the MalopProcess Element and MalopLogonSession Element, you must run separate requests for each Element to retrieve all Malops.
Note
Although versions 20.1 and later include a new endpoint to retrieve Malop details (/rest/detection/inbox), you can still use the endpoint (/rest/crimes/unified) in the example below on these versions.
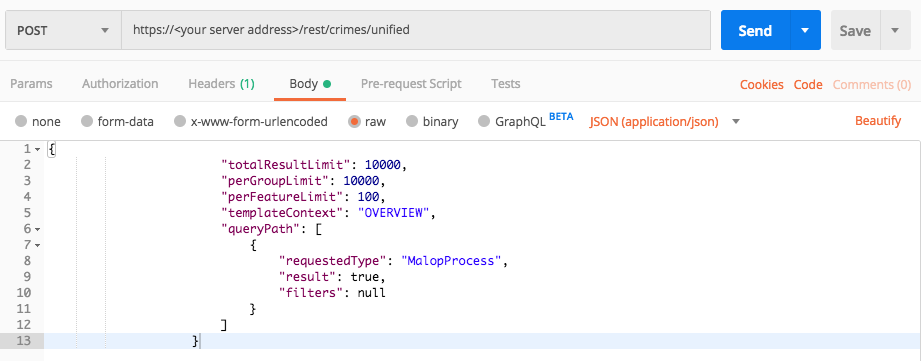
To build the request, replace the placeholders in the relevant cURL command, request body example, or Python script:
curl --request POST \
        --url http://myserver.com/rest/crimes/unified \
        --header 'Content-Type:application/json' \
        --data '{
                                        "totalResultLimit": 10000,
                                        "perGroupLimit": 10000,
                                        "perFeatureLimit": 100,
                                        "templateContext": "OVERVIEW",
                                        "queryPath": [
                                                      {
                                                        "requestedType": "MalopProcess",
                                                        "result": true,
                                                        "filters": null
                                                      }
                                                     ]
                                     }'
Depending on your browser settings, this linked file may open in a separate tab instead of downloading directly to your machine. If this happens, use the Save As option in your browser to save the file locally.
Use this request body:
{
			            "totalResultLimit": 10000,
			            "perGroupLimit": 10000,
			            "perFeatureLimit": 100,
			            "templateContext": "OVERVIEW",
			            "queryPath": [
			                {
			                    "requestedType": "MalopProcess",
			                    "result": true,
			                    "filters": null
			                }
			            ]
			        }
All Python examples are formatted for Python version 3.0 and higher, up to the latest Python version. If you are using versions of Python earlier than 3.0, ensure you manually remove parentheses for the print statements in this sample. For example, the print (response.content) statement updates to print response.content.
Note
The code in this sample is repeated in the second sample below. You do not need to run the script now but it is used here to help you understand how you build the request.
Depending on your browser settings, this linked file may open in a separate tab instead of downloading directly to your machine. If this happens, use the Save As option in your browser to save the file locally.
Use this request body:
import requests
import json

# Login information

username = "[email protected]"
password = "mypassword"
server = "myserver.com"
port = "443"

data = {
    "username": username,
    "password": password
}

headers = {"Content-Type": "application/json"}

base_url = "https://" + server + ":" + port

login_url = base_url + "/login.html"

session = requests.session()

login_response = session.post(login_url, data=data, verify=True)

print (login_response.status_code)
print (session.cookies.items())

# Request URL

endpoint_url = "/rest/crimes/unified"

api_url = base_url + endpoint_url
null = None

query = json.dumps({"totalResultLimit": 10000,"perGroupLimit":10000,"perFeatureLimit":100,"templateContext":"OVERVIEW","queryPath":[{"requestedType": "MalopProcess","result": True,"filters": null}]})

api_headers = {'Content-Type':'application/json'}

api_response = session.request("POST", api_url, data=query, headers=api_headers)

your_response = json.loads(api_response.content)

print(json.dumps(your_response, indent=4, sort_keys=True))
Step 2: Run the request and generate the response
In the command line, REST API client, or IDE, run the command or script that contains the request. After a few seconds, the Cybereason API returns a response.
Step 3: Evaluate the response
When the Cybereason API returns a response for a Malop retrieval request, the data in the response contains many different pieces of data.
However, to remediate an item in a Malop, you only need to locate the unique Malop ID. The Malop ID normally begins with 11 and are found throughout the response.
When you run the request for the endpoint to perform remediation, one of the parameters it can use is the Malop ID. (It is possible to remediate an item without a Malop but we are not using that in this scenario.) Therefore, you want to find the Malop IDs in the response for the first request.
To find the Malop ID, in the request body, locate the data object, and then locate the resultIdToElementDataMap object. The key that immediately follows these object fields is the Malop ID:

Note
The example Python scripts in this topic contain the code to automatically find these values and print them in an easily visible way, so that you do not have to read each line in the response.
Step 4: Build the request to remediate items
When you create the request body to perform remediation, you need to specify values for the following keys:
malopId
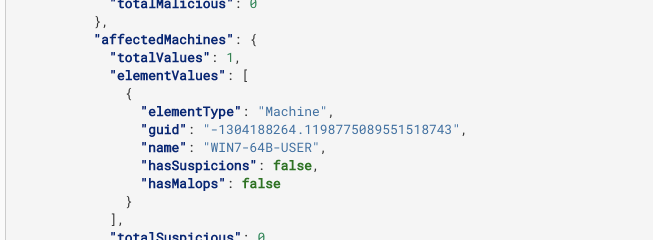
machine GUID: This is the unique identifier the Cybereason platform uses for the specific machine. You can find this value in the response in the guid field in the affectedMachines object:
The remediation action to perform. You can perform a number of remediation actions from the API, including ISOLATE_MACHINE, KILL_PROCESS, DELETE_REGISTRY_KEY, OR QUARANTINE_FILE.
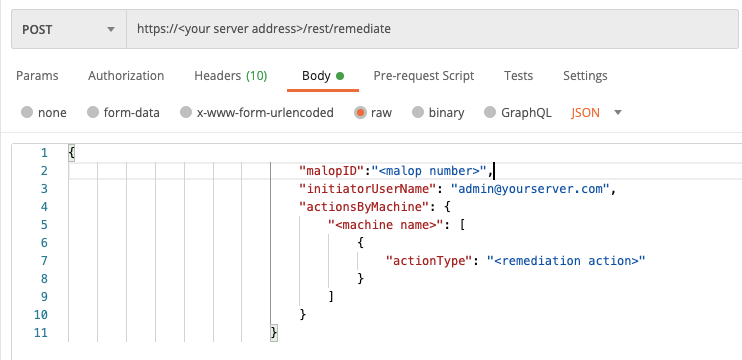
To build a request to remediate an item, replace the placeholders in the following cURL command, request body example, or Python script with the values that you want:
curl --request POST \
        --url http://myserver.com/rest/remediate \
        --header 'Content-Type:application/json' \
        --data '{
                                                "initiatorUserName": "[email protected]",
                                                "actionsByMachine": {
                                                    "<machine name>": [
                                                        {
                                                            "actionType": "<remediation action>"
                                                        }
                                                    ]
                                                }
                                            }'
Depending on your browser settings, this linked file may open in a separate tab instead of downloading directly to your machine. If this happens, use the Save As option in your browser to save the file locally.
Use this request body:
{
							    "initiatorUserName": "[email protected]",
							    "actionsByMachine": {
							        "<machine name>": [
							            {
							                "actionType": "<remediation action>"
							            }
							        ]
							    }
							}
All Python examples are formatted for Python version 3.0 and higher, up to the latest Python version. If you are using versions of Python earlier than 3.0, ensure you manually remove parentheses for the print statements in this sample. For example, the print (response.content) statement updates to print response.content.
Depending on your browser settings, this linked file may open in a separate tab instead of downloading directly to your machine. If this happens, use the Save As option in your browser to save the file locally.
Use this request body:
import requests
import json

# Login information

username = "[email protected]"
password = "mypassword"
server = "myserver.com"
port = "443"

data = {
    "username": username,
    "password": password
}

headers = {"Content-Type": "application/json"}

base_url = "https://" + server + ":" + port

login_url = base_url + "/login.html"

session = requests.session()

login_response = session.post(login_url, data=data, verify=True)

print (login_response.status_code)
print (session.cookies.items())

endpoint_url = "/rest/crimes/unified"

api_url = base_url + endpoint_url
null = None

query = json.dumps({"totalResultLimit": 10000,"perGroupLimit":10000,"perFeatureLimit":100,"templateContext":"OVERVIEW","queryPath":[{"requestedType": "MalopProcess","result": True,"filters": null}]})

api_headers = {'Content-Type':'application/json'}

api_response = session.request("POST", api_url, data=query, headers=api_headers)

your_response = json.loads(api_response.content)

results_list = (your_response['data']['resultIdToElementDataMap'].keys())

malop_id = (results_list[1])

machine_name = (your_response['data']['resultIdToElementDataMap'][malop_id]['elementValues']['affectedMachines']['elementValues'][0]['name'])

endpoint_url_2 = "/rest/remediate"

api_url_2 = base_url + endpoint_url_2

remediation_action = "KILL_PROCESS"

query = json.dumps({"malopId":malop_id,"initiatorUserName": "[email protected]","actionsByMachine":{machine_name:[{"actionType": remediation_action}]}})

api_response = session.request("POST", api_url_2, data=query, headers=headers)

your_response = json.loads(api_response.content)

print(json.dumps(your_response, indent=4, sort_keys=True))
Step 5: Run the request and generate the request body
In the command line, REST API client, or IDE, run the command or script that contains the request. After a few seconds, the Cybereason API returns a response.
Step 6: Evaluate the response
To verify that the request to remediate an item was processed by your server., view the results object and ensure the status field reports success.
However, to ensure that the remediation completed, you need to check the remediation status in the Cybereason UI as a success request from the API does not ensure the remediation was completed on the sensor. Only the Cybereason UI reports that status.